Prerequisite
The below steps are only applicable when a legacy version of Osiris is installed on the system. The upgrade process is designed to be as interruption-free as possible.
Upgrade Process
1. Make a backup of your legacy Osiris license file. The file is typically located in C:\Program Files\Osiris and has a .license extension.
2. Download the latest Osiris 2 installer from the Osiris download portal.
3. Double-click on the osiris_2.x.x_setup.msi file to start the installation process
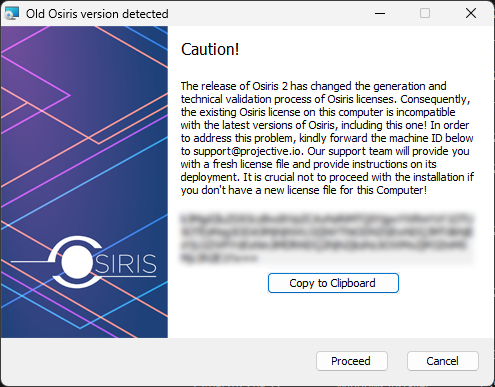
4. You will see the following message:

5. Copy the Machine ID to the clipboard and then save it to a spreadsheet or text document alongside the name of the Computer.
6. Cancel the installation by clicking on the Cancel button. This ensures that you can continue using legacy Osiris until you have received a new license file for Osiris 2.
7. Repeat steps 1 – 5 for all the Computers that are running legacy Osiris.
8. Put the Machine IDs and computer names in a spreadsheet and send it to support@projective.io. Our support will then provide the new licenses for Osiris 2.
9. Once you have received the new license file, proceed with the activation chapter of this manual.
10. Once you have placed the license file, start Osiris.
11. You will see this message. Click Yes to replace the bin-locking mechanism of the legacy Osiris with the new one. If replacing the existing bin-locking feature fails, Start the Osiris app as an Administrator and click Yes again. Administrator privileges won’t be needed on subsequent app launches.

12. Test if bin-locking is working by following the steps in the usage chapter.
13. If everything is working as expected you may uninstall the legacy Osiris app from the Computer using the Windows Add or remove programs feature. Be advised that the name of the legacy Osiris is Projective Osiris while the name of the new app is Osiris 2. Make sure to uninstall only the Projective Osiris app from the Computer.
Need more help with this?
Visit the Projective Support Websites
